So, I've neglected to update. A big part of this is a lack of interesting photos. A big part of that is being so focused on simply trying to keep my bees alive (and not getting stung) that I forget my camera.
Winter is upon us in just a few days and my bees are safely nestled in their wooden box. They managed to store some honey and cap it, but not nearly the 40 lbs a healthy hive would need to survive the winter. That's a lot of honey!
Once fall arrived, I realized that my bees situation was desperate and if they were to make it to spring, they'd need some help. I guess that's why they call us beekeepers and not beewatchers. I made sure to continue supplying the bees with sugar water from my feeder, but this truly is bee junk food. Not to mention, my ant problems returned thanks to the sugar, albeit in the form of tiny ants this time.
Watching the bees fend off the miniature, by comparison, ants is fascinating. The ants are too small for the bees to attack. Instead, they "herd" the ants away, flapping their wings and vibrating furiously. Undoubtedly some ants evade this technique, but it keeps them from overwhelming the bees' access to the sweet sugar water. The ants were incredibly numerous, though, and enough of a problem that I scattered diatomaceous earth (DM) around the legs of the hive and along the trail of ants through the grass. There is a lot of controversy surround DM and its safety for use around hives, but I've noticed no ill effect on the bees as it is not a chemical and must be transferred to the inside of the hive to be harmful. I'm sure the ants caused some traces to enter the hive, but not nearly enough to cause as much a problem the ants were.
Monday, December 17, 2012
Monday, August 27, 2012
A New Beeginning
The season for catching swarms is long gone come the first week of July. This means a complete rethinking of how to get a new hive started this summer. Again, it is honeybee biology and social structure to the rescue!
The traditional way to turn one beehive into two beehives is to split the hive. This involves taking a robust hive and removing frames of bees. Frames are the structures inside the traditional boxy Langstroth hives most people associate with beekeeping. Fortunately for me, there is a healthy observation colony at Irvine that regularly needs frames removed from it to give the queen room to lay eggs and prevent the hive from becoming overcrowded.
To get the worker bees to raise a new queen, two frames with bees are removed from this hive (there are only four frames in it total) and are replaced with empty frames. The frames removed will ideally have capped brood (pupa ready to emerge as adults), larva at various stages, eggs, and some capped honey for sustaining the larva. They are placed in a small, half hive called a nuc, short for nucleus. A frame of honey from another hive and two empty frames are placed in the nuc box. The bees will use several of the eggs available to them to rear a new queen in this box. All the frames with the new queen and all the bees are later transferred to a new hive body. The whole process takes close to a month.
There are a few problems, though. The nuc box is made for 19-inch frames. I have top bars that are 17 3/4-inches long. The frames in the nuc normally have cells on them already so the bees don't need to waste energy and resources building wax. Top bars require the bees to build fresh comb.
The solution to the second problem was simple. Since my first hive failed, I had new comb already drawn on three top bars.

To solve the first problem, I simply jury-rigged an extension onto the back wall of the nuc box allowing two of my comb covered top bars to hang from it.
The next time the observation hive needed frames removed, we put them into the nuc with my top bars. Within two weeks, a new queen was walking around in the hive! less than two weeks later, I opened the box to see her inspecting my comb for egg laying purposes. I quickly moved the two bars into my hive body and shook the bees off one of the frames and into my hive. I watched for a bit as the confused bees flew through the air. Fortunately, they were picking up the strong scent from the bees and queen in my hive and many of the bees flew in to join them. Some strayed back to the nuc, however.
The next day, I fed the new colony some 2:1 sugar:water syrup and it was time to wait and hope they would stay in there for the long haul!
The traditional way to turn one beehive into two beehives is to split the hive. This involves taking a robust hive and removing frames of bees. Frames are the structures inside the traditional boxy Langstroth hives most people associate with beekeeping. Fortunately for me, there is a healthy observation colony at Irvine that regularly needs frames removed from it to give the queen room to lay eggs and prevent the hive from becoming overcrowded.
To get the worker bees to raise a new queen, two frames with bees are removed from this hive (there are only four frames in it total) and are replaced with empty frames. The frames removed will ideally have capped brood (pupa ready to emerge as adults), larva at various stages, eggs, and some capped honey for sustaining the larva. They are placed in a small, half hive called a nuc, short for nucleus. A frame of honey from another hive and two empty frames are placed in the nuc box. The bees will use several of the eggs available to them to rear a new queen in this box. All the frames with the new queen and all the bees are later transferred to a new hive body. The whole process takes close to a month.
There are a few problems, though. The nuc box is made for 19-inch frames. I have top bars that are 17 3/4-inches long. The frames in the nuc normally have cells on them already so the bees don't need to waste energy and resources building wax. Top bars require the bees to build fresh comb.
The solution to the second problem was simple. Since my first hive failed, I had new comb already drawn on three top bars.

To solve the first problem, I simply jury-rigged an extension onto the back wall of the nuc box allowing two of my comb covered top bars to hang from it.
 |
| I originally screwed this board to three of the top bars. I would later not worry about the screws because the bees would seal the bars in place with propolis. I also kept it to two bars because the comb broke off of one when I dropped it. |
 |
| How it will look in the nuc box. |
The next time the observation hive needed frames removed, we put them into the nuc with my top bars. Within two weeks, a new queen was walking around in the hive! less than two weeks later, I opened the box to see her inspecting my comb for egg laying purposes. I quickly moved the two bars into my hive body and shook the bees off one of the frames and into my hive. I watched for a bit as the confused bees flew through the air. Fortunately, they were picking up the strong scent from the bees and queen in my hive and many of the bees flew in to join them. Some strayed back to the nuc, however.
The next day, I fed the new colony some 2:1 sugar:water syrup and it was time to wait and hope they would stay in there for the long haul!
Sunday, July 29, 2012
To Catch a Swarm
One of the great things about keeping bees, especially for the first time, is you already know there is a decent chance they could up and leave. This helps curb the disappointment of losing a colony. The most important thing is to learn from the experience and make corrections to how you kept your colony before the swarm.
The other good part about bees swarming is that your bees are not the only ones that may do it. Throughout the early spring, It seemed swarms were being spotted all over the place by friends and family. As much as beekeepers seem to hate their hives swarming, they LOVE finding a swarm.
A swarm is focused on one thing: finding a new place to build comb and a colony. Scout bees have already found suitable places, it's just a matter of moving together to that new place. What a beekeeper wants to do is capture that swarm with the queen and choose their new home for them (i.e. a beehive). Of course each swarm I learned about was far too far away to go capture (I even saw one up in Seattle!) . . . until a little over a week after my bees left.
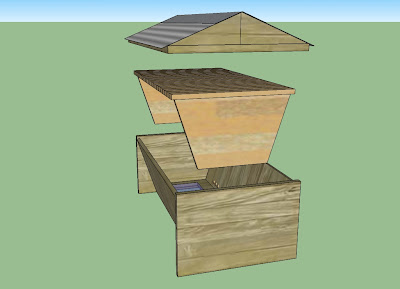
A homeowner left a message with the nature center reporting a swarm. I called them back and left a message explaining I was interested in trying to capture the swarm if they could give me their address. Soon after work, I heard back from them and spent my afternoon making this wonderful bee swarm capturing box:
 The idea is to gently scrape or forcefully shake the bees into the box, hopefully getting the queen inside. Then I would put the lid on. Next step would be to wait while the bees flying in the air sniff around for their queen. They would enter the box through the funnel, but the funnel would prevent them from being able to fly back out. Tada! Swarm captured.
Unfortunately, upon arriving at their home, I learned they had an actual hive of bees living in the wall of their house. Lacking the knowledge and equipment to get them out, I left disappointed. A few weeks later, Wally received a similar call which turned out to be a hive of yellow jackets, so at least I made out better than him. Turns out, not everyone knows a bee swarm from bunch of bees (or wasps).
So, now on to plan B which I'll outline in my next post.
The other good part about bees swarming is that your bees are not the only ones that may do it. Throughout the early spring, It seemed swarms were being spotted all over the place by friends and family. As much as beekeepers seem to hate their hives swarming, they LOVE finding a swarm.
A swarm is focused on one thing: finding a new place to build comb and a colony. Scout bees have already found suitable places, it's just a matter of moving together to that new place. What a beekeeper wants to do is capture that swarm with the queen and choose their new home for them (i.e. a beehive). Of course each swarm I learned about was far too far away to go capture (I even saw one up in Seattle!) . . . until a little over a week after my bees left.
A homeowner left a message with the nature center reporting a swarm. I called them back and left a message explaining I was interested in trying to capture the swarm if they could give me their address. Soon after work, I heard back from them and spent my afternoon making this wonderful bee swarm capturing box:

Unfortunately, upon arriving at their home, I learned they had an actual hive of bees living in the wall of their house. Lacking the knowledge and equipment to get them out, I left disappointed. A few weeks later, Wally received a similar call which turned out to be a hive of yellow jackets, so at least I made out better than him. Turns out, not everyone knows a bee swarm from bunch of bees (or wasps).
So, now on to plan B which I'll outline in my next post.
Sunday, July 8, 2012
And away we go!
I was headed out to lunch on June 21st when I saw a beard of bees clustered outside of my hive. I went up to check to see if the cluster was my bees. Indeed it was my bees . . . all of them.

No bees were left inside the hive, which meant the queen was somewhere under that cluster. Now, it was a very hot day, so Wally suggested there may not have been enough bees to keep the hive cool, so a bunch moved outside. But, with the queen in the group, it most likely meant the bees were preparing to swarm and abandon ship.
So why would such a small bunch of bees swarm like this? Usually, it is due to several negative factors. I have two immediate thoughts on what caused the bees to prepare to swarm.
First, from day one, carpenter ants were raiding the sugar water I placed in the hive. A strong colony would be able to fend these ants off, but my colony never really reached a size (due to the loss of the first queen) that was able to overtake them. I even witnessed some of the carpenter ants team up and kill a bee or two as the bees wandered near the sugar water. I suspect the ants began raiding the honeycomb as the population of bees dropped and as we were trying to boost them back up.
Second, the hive certainly could have gotten too hot. There was more sun than I expected where I placed my hive. In a few years, it may be a good spot for an apiary, but apparently, not yet.
Unfortunately, once the bees begin swarming actions, there is little you can do to stop them. They have already picked a new place to live. With a colony as small as mine, it would not be worth putting the stress on them to try to recapture the group.
At 5:00, I walked back up to my hive to see what was going on. Suddenly, the bees began to take off, swirling up into the air. I sat on the ground as I watched every last one buzz off into the air, filling the sky around me. Then, they were gone, hopefully to a new home that they would be able to flourish in.

No bees were left inside the hive, which meant the queen was somewhere under that cluster. Now, it was a very hot day, so Wally suggested there may not have been enough bees to keep the hive cool, so a bunch moved outside. But, with the queen in the group, it most likely meant the bees were preparing to swarm and abandon ship.
 |
| The queen is in the highlighted circle (still a virgin). |
So why would such a small bunch of bees swarm like this? Usually, it is due to several negative factors. I have two immediate thoughts on what caused the bees to prepare to swarm.
First, from day one, carpenter ants were raiding the sugar water I placed in the hive. A strong colony would be able to fend these ants off, but my colony never really reached a size (due to the loss of the first queen) that was able to overtake them. I even witnessed some of the carpenter ants team up and kill a bee or two as the bees wandered near the sugar water. I suspect the ants began raiding the honeycomb as the population of bees dropped and as we were trying to boost them back up.
Second, the hive certainly could have gotten too hot. There was more sun than I expected where I placed my hive. In a few years, it may be a good spot for an apiary, but apparently, not yet.
Unfortunately, once the bees begin swarming actions, there is little you can do to stop them. They have already picked a new place to live. With a colony as small as mine, it would not be worth putting the stress on them to try to recapture the group.
At 5:00, I walked back up to my hive to see what was going on. Suddenly, the bees began to take off, swirling up into the air. I sat on the ground as I watched every last one buzz off into the air, filling the sky around me. Then, they were gone, hopefully to a new home that they would be able to flourish in.
 |
| Flying off into the sunset. |
Wednesday, June 20, 2012
Hatchling
Even with a new queen on the way, my bees were in a bit of an emergency situation. So, one day Wally and I decided to try to help them out. Wally maintains Irvine's bee colonies and observation hive and I try to help him out when I can. Out in the meadow, there is a top bar hive that had the potential to tremendously help my bees.
We went out to the top bar, opened it all up and started looking for some good brood comb. It didn't take long to find a good piece that we were able to cut off an rubberband to one of my top bars (the top bars on Wally's hive are longer than mine and wouldn't fit in my hive). With this new bit of ready-to-hatch brood and some nurse bees, the hope was they would boost my colony's population.
About a week later, I was finally able to look in to see if the new queen and brood had hatched. They had! It did not take long at all to see a virgin queen walking around on the comb.
There was, however, more bad news . . . the new bees had already exhausted the supply of honey the workers had been storing for the past couple weeks. Following normal procedure, I made more sugar syrup to feed to the bees and placed it in the hive. In order to try to guard against carpenter ants, I placed used coffee grounds, chili powder, and pepper around the base of the legs of the hive.
Even though there is a new queen, she is still a virgin. In a day or so, she will take off on a mating flight. This is where the spectacular courtship of the honeybee takes place, culminating in male genital explosion (literally). The queen will fly up between 20 and 50 feet in the air where a "river" of drones are flying back and forth through the sky. This is known as a drone congregation area (DCA) and could be as far as 1.5 miles away from the hive. Drones are the male bees of a colony.
Now, the guy who discovered the elevation at which bees do the deed used an interesting trick. He knew the whereabouts of a DCA and walked through it with a queen bee in a cage tied to a helium filled balloon. He held the string at various lengths. 10' - no bees. 15' - no bees. 20' - THE BIRDS AND THE BEES!
Once a drone catches up with the queen, he will mate with her. On occasion, the queen will mate with more than one drone, perhaps on several flights. The goal of the drone is to pass on a massive amount of his genes and he has a trick to help ensure he gets more of his in the queen than any other drone. During copulation, the drone will arch back sharply, snapping his genitalia and forcing his semen to explode into the queens body.
The violence of the motion causes his genitals to snap off and remain in the queen. As he falls down, down, down to the ground (or a burning ring of fire?) to his certain death having lost a large portion of his body, another drone will remove the old drones remains from the queen and mate with her himself. Cool pictures of the process can be found here.
We went out to the top bar, opened it all up and started looking for some good brood comb. It didn't take long to find a good piece that we were able to cut off an rubberband to one of my top bars (the top bars on Wally's hive are longer than mine and wouldn't fit in my hive). With this new bit of ready-to-hatch brood and some nurse bees, the hope was they would boost my colony's population.
About a week later, I was finally able to look in to see if the new queen and brood had hatched. They had! It did not take long at all to see a virgin queen walking around on the comb.
 |
| Hatched queen cells (and brood) are on the white comb. The brown comb is from the other hive. |
Even though there is a new queen, she is still a virgin. In a day or so, she will take off on a mating flight. This is where the spectacular courtship of the honeybee takes place, culminating in male genital explosion (literally). The queen will fly up between 20 and 50 feet in the air where a "river" of drones are flying back and forth through the sky. This is known as a drone congregation area (DCA) and could be as far as 1.5 miles away from the hive. Drones are the male bees of a colony.
Now, the guy who discovered the elevation at which bees do the deed used an interesting trick. He knew the whereabouts of a DCA and walked through it with a queen bee in a cage tied to a helium filled balloon. He held the string at various lengths. 10' - no bees. 15' - no bees. 20' - THE BIRDS AND THE BEES!
Once a drone catches up with the queen, he will mate with her. On occasion, the queen will mate with more than one drone, perhaps on several flights. The goal of the drone is to pass on a massive amount of his genes and he has a trick to help ensure he gets more of his in the queen than any other drone. During copulation, the drone will arch back sharply, snapping his genitalia and forcing his semen to explode into the queens body.
The violence of the motion causes his genitals to snap off and remain in the queen. As he falls down, down, down to the ground (or a burning ring of fire?) to his certain death having lost a large portion of his body, another drone will remove the old drones remains from the queen and mate with her himself. Cool pictures of the process can be found here.
Sunday, June 10, 2012
The Queen is Dead . . . Long Live the Queen!
Drama in the colony - the queen is dead . . .
I peeked into the hive late in the week and noticed a queen cup on one of the combs. Bees normally build queen cups throughout the colony just in case they will need to raise a new queen. The fact that they built this one so early in the life of the colony , however, had me worried.
A few days later, I did a more thorough inspection and my suspicions were unfortunately realized. The queen and new eggs were nowhere to be seen. This could mean one of two things: she flew the coop with a swarm or she died. A few signs point to the latter.
First, the bees built a queen cup to place an egg in. This queen cup was a capped queen cell by the time I saw it the second time. Second, there were about the same number of bees in the hive before and after the queen went missing. Third, in addition to the queen cell, I saw several "emergency queen cells" made from what would have been horizontal cells where normal workers would be reared. This suggests the queen suddenly went missing and the bees had to augment normal brood cells to accommodate a developing queen (this must be done within 4 hours of the queen dying).
The most common reason a queen dies, especially so quickly, is a clumsy beekeeper smooshing her when moving frames around. I am fairly confident I did not do this since I am using a frameless hive, knew where she was, and have been supremely careful with my bees. I suppose I could have done something else to harm her, but I prefer to think that something more dramatic occurred like an epic battle with a carpenter bee or that she valiantly fought off the carpenter ants as they tried to steal the young larva.
In any case, the queen cells mean I will hopefully have a new queen to replace the old one. There is also a good amount of capped brood in the hive which means there will be some new bees to replace any that die in the next couple weeks. While I was pretty bummed the day I found out I no longer had a queen, I am feeling a bit more optimistic now.
Sunday, June 3, 2012
A Visit from Catie
I wanted Catie to see my bees at work so we decided to go after church on Sunday. The bees were still pretty busy building comb and fetching nectar and were not very aggressive.


Thursday, May 31, 2012
Bees in a Box
So I dumped 3lbs of bees in a box to free their queen and . . . now what?
Now, it's time to wait. It was really difficult not to look inside the hive, but very important that I gave them time to settle into their new home. After a few days passed, however, it was time to take a peek!
On Friday, I fired up my smoker for the first time, zipped on my jacket and veil, and was ready to see how my little gals were doing. I very lightly smoked the entrance and took off the lid. The first thing to do was pull up the queen box and see if she was released. A quick look showed that she was out and about. A good sign! One by one, I removed top bars to check for comb being built. It did not take long to find some!
I quickly realized I did not need to worry about smoking the bees. Smoke has long been known to "calm" bees. Basically, a little smoke does two things: some of the bees will prepare to abandon the hive by drinking honey, as though there is a forest fire; the smoke will make it difficult to smell any alarm pheromones being sent out by guard bees. Since my colony is so new, they are pretty much focused on building up their resources and not defending the hive.
I quickly checked two of the combs. It did not take long to find the queen laying eggs. There was even honey and pollen in some of the cells. All signs show the colony is off to a good start.
Now, it's time to wait. It was really difficult not to look inside the hive, but very important that I gave them time to settle into their new home. After a few days passed, however, it was time to take a peek!
On Friday, I fired up my smoker for the first time, zipped on my jacket and veil, and was ready to see how my little gals were doing. I very lightly smoked the entrance and took off the lid. The first thing to do was pull up the queen box and see if she was released. A quick look showed that she was out and about. A good sign! One by one, I removed top bars to check for comb being built. It did not take long to find some!
 |
| The yellow on the new comb is pollen the bees collected. |
I quickly realized I did not need to worry about smoking the bees. Smoke has long been known to "calm" bees. Basically, a little smoke does two things: some of the bees will prepare to abandon the hive by drinking honey, as though there is a forest fire; the smoke will make it difficult to smell any alarm pheromones being sent out by guard bees. Since my colony is so new, they are pretty much focused on building up their resources and not defending the hive.
 | |
| The queen is somewhere under the other bees in this photo. |
I quickly checked two of the combs. It did not take long to find the queen laying eggs. There was even honey and pollen in some of the cells. All signs show the colony is off to a good start.
Saturday, May 26, 2012
The Coming of the Bees
Needless to say, I was filled with excitement in the anticipation of my bees arrival May 9th. Fortunately, this excitement managed to last until two weeks later, when my bees actually arrived.
I received a call around 7:30AM from the Owings Mills post office. The woman on the other end, with a bit of forced cheerfulness in her voice, said, "Your bees have arrived. We open at 9:00." I arrived shortly after the doors opened and proudly stated that I was there to pick-up my bees. The woman behind the counter disappeared to the back for a few minutes before returning. Just behind her was a man holding the package of bees well away from his body. I guess not everyone is so happy to see our little honey helpers in the morning.
I put the swarm in my car and headed off to Irvine to introduce them to their new home.
Prior to their arrival, I made sure the hive was nice and level. This is an important step as the bees will draw their comb as gravity directs them. A level hive will hopefully mean nice straight combs that are easy to work with and make the best use of the hive's space.


Another quick step was to build a feeder to feed the new colony sugar syrup. They had been in transit for the past few days and it's important that they have some fresh carbohydrates to build the honeycomb with. Sugar syrup (1lb sugar/ 1 pint water) is not the best dietary supplement for the bees, but does the trick to get them started.
Once the feeder was in the hive it was time to welcome home the queen. The package has a can full of sugar water sealing it shut. First, I mist the bees with a bit of sugar water to keep them occupied. After loosening the can and lifting it straight up, I have access to the "mini-package" the queen comes in.
The queen box is sealed with sugar to keep her enclosed for a couple days while the other bees get accustomed to the new home. The other bees eat away at the sugar to free her. During the shipping, a small cork keeps them from being able to do this. I removed the cork before attaching the box to a top bar with a push pin.
Now, it's time to dump in the rest! After firmly tapping the package against the ground to loosen all the bees, I spray them again with sugar water. Then, I fully remove the can and literally turn the package over and pour the bees into hive. Of course, this also means hundreds of bees flying around in the air too! All there is left to do is close off the hive by putting the top bars in place and put on the lid.

I received a call around 7:30AM from the Owings Mills post office. The woman on the other end, with a bit of forced cheerfulness in her voice, said, "Your bees have arrived. We open at 9:00." I arrived shortly after the doors opened and proudly stated that I was there to pick-up my bees. The woman behind the counter disappeared to the back for a few minutes before returning. Just behind her was a man holding the package of bees well away from his body. I guess not everyone is so happy to see our little honey helpers in the morning.
 |
| The bees in the screened package. |
 | |||||||||||||||||||||||
| Welcome to Maryland, bees! |
I put the swarm in my car and headed off to Irvine to introduce them to their new home.
Prior to their arrival, I made sure the hive was nice and level. This is an important step as the bees will draw their comb as gravity directs them. A level hive will hopefully mean nice straight combs that are easy to work with and make the best use of the hive's space.

 |
| There are quite a few orioles at Irvine. This one sang beautifully while I used some scrap wood to level the hive. |

 | |||||||||||||||
| Close enough |
Another quick step was to build a feeder to feed the new colony sugar syrup. They had been in transit for the past few days and it's important that they have some fresh carbohydrates to build the honeycomb with. Sugar syrup (1lb sugar/ 1 pint water) is not the best dietary supplement for the bees, but does the trick to get them started.
 | |
| Just a few corks pressed into drilled holes spaced to hold a mason jar. |
 |
| Just a few small holes in the lid. |
 |
| Vacuum sealed and ready for the bees to get a drink! |
Once the feeder was in the hive it was time to welcome home the queen. The package has a can full of sugar water sealing it shut. First, I mist the bees with a bit of sugar water to keep them occupied. After loosening the can and lifting it straight up, I have access to the "mini-package" the queen comes in.
 |
| The queen and a few loyal subjects that take care of her during the journey. |
 |
| The queen box attached to one of the top bars. The bees will probably begin by building comb on this bar. |
The queen box is sealed with sugar to keep her enclosed for a couple days while the other bees get accustomed to the new home. The other bees eat away at the sugar to free her. During the shipping, a small cork keeps them from being able to do this. I removed the cork before attaching the box to a top bar with a push pin.
Now, it's time to dump in the rest! After firmly tapping the package against the ground to loosen all the bees, I spray them again with sugar water. Then, I fully remove the can and literally turn the package over and pour the bees into hive. Of course, this also means hundreds of bees flying around in the air too! All there is left to do is close off the hive by putting the top bars in place and put on the lid.

 |
| Releasing thousands of honeybees upon the world! |
 |
| All finished by 10:00AM. |
 |
| Happy to bee home. |
Tuesday, May 8, 2012
They're Coming!
My bees are set to arrive tomorrow!
It's a good thing these came in the mail today . . .

It's a good thing these came in the mail today . . .

Thursday, May 3, 2012
Finishing Touches
Before I painted the hive, I measured out some handy legs to attach. For some odd reason, I didn't take any photos of the legs as I worked on them. They are pretty simple and cut so that they support the hive by the bottom while attaching to the front and back with 2.5" galvanized bolts.
Here you can see the top bars on top of the hive here without the lid. I do not have the woodworking expertise to make these beautiful triangle top bars that are a single piece of wood. There are a lot of ways to make top bars, but ones like this can support a lot of honeycomb and give a large surface for the bees to build on. My uncle Tommy, an excellent woodworker, made them out of a walnut tree from where I grew up.
Once the legs were attached, the only thing left to do was put some hardware cloth on the bottom and on the entrance and vent holes. The hardware cloth on the bottom is small so the bees cannot get through and is to allow ventilation. On the entrance holes, it is 1/2" so the bees can go in and out, but mice cannot raid the hive or nest in it.
Finally, I was able to move the hive up to its final resting place!


 |
| It has legs! I made them short so I can put the hive on cinder blocks and keep all the wood off the ground. |
 |
| The top bars in the hive. |
 |
| Top bar |
 |
| 1/2" hardware cloth on the entrance holes and 1/8" on the floor |
Finally, I was able to move the hive up to its final resting place!


Monday, April 30, 2012
Painting
I initially wanted to paint my hive with a mix of linseed oil and beeswax to be a bit more natural with it. After getting some advice on the matter (and free exterior paint) I changed my mind. The thing is, you only paint the outside of the hive to protect the wood. It has nothing to do with what the bees are doing inside the hive.
Painting with linseed oil would mean needing to reapply it every year. This just doesn't seem to be a smart thing to do with a hive full of bees.

Once the paint dried, I brought the hive inside and drilled entrance holes. The entrance does not need to be anything fancy so long as you can make it bigger or smaller depending on the health and size of your colony. This is important because the bees need to be able to guard their entrance. A weak colony cannot guard a large entrance. So, when my colony starts out, I will have most of the holes plugged with corks. As the colony grows, I will unplug the corks to give the workers more room to fly in and out of the hive.
 |
| You can see that I also added a ventilation/entrance hole on the opposite corner from the entrance. The entrance holes are spaced 1.5" apart. |
 |
| Corks! |
Friday, April 27, 2012
Other Beekeeping Necessities
Anticipating the completion of my hive and the availability of bees from a co-worker's top bar hive, I placed an order for the other equipment I will need. The necessities are really quite simple: a veil to cover the face, a smoker for "calming" the bees, and a hive tool for prying the bars free and scraping brace comb and propolis. I ordered these from H.T. Krantz, a company in Frederick, MD.
Unfortunately, the jackets and hive tools are back-ordered, so nothing has arrived yet. I'm pretty disappointed that I did not know this before ordering. I would have preferred to pay the slightly higher prices at other suppliers and get my goods sooner. That being said, the prices are considerably cheaper with H.T. Krantz for what I wanted.
Good news is, I ordered my bees! I spoke on the phone with a very nice lady (Ruth Seaborn) down in Tennessee at Wolf Creek Apiaries. I really wanted bees from Draper's Super Bees in PA, but the price just wasn't right. Wolf Creek's bees are also used to building smaller, more natural cells so I'm hoping they work well in the top bar. Total price w/ shipping $108.75 for 3lbs. and a queen. They are set to be shipped May 8th!
| HTK Professional Beekeeper's Jacket - Size: Medium |
HK-BKJ | $48.99 | 1 | $48.99 |
| 7" HTK Hobby Smoker | HK-SM7 | $27.99 | 1 | $27.99 |
| Maxant Hive Tool | MI-MHT | $11.49 | 1 | $11.49 |
| Pure Beeswax - 1LB | HK-BW1 | $6.00 | 1 | $6.00 |
| Sub-Total: | $94.47 | |||
| Ups Ground: | $11.09 | |||
| Maryland Tax (6%): | $5.67 | |||
| Total: | $111.23 | |||
Good news is, I ordered my bees! I spoke on the phone with a very nice lady (Ruth Seaborn) down in Tennessee at Wolf Creek Apiaries. I really wanted bees from Draper's Super Bees in PA, but the price just wasn't right. Wolf Creek's bees are also used to building smaller, more natural cells so I'm hoping they work well in the top bar. Total price w/ shipping $108.75 for 3lbs. and a queen. They are set to be shipped May 8th!
Topping It Off
I managed to screw up the measurements on a lid for my bee box not once, but twice. Both times, it was not long enough. It was a pretty simple mistake I made, but a bit silly that I made it twice . . . err three times. Yup, the third time was a hair too short as well because I cut an angle the wrong was and had to make a new cut. Fortunately, it was fixed easily and made for a snug but not tight lid.
The next step was to cover the frame with a light but tough material that would repel water. At first, I was thinking of using old discarded corrugated plastic signs. Then, I remembered that Irvine has a yards and yards of old vinyl banners! Perfect for the roof.


Now, I had to do some upholstering. Having no experience in this, I should have looked on the internet. I didn't, but the bees won't care that the roof is not perfect, so long as it keeps water out.
Thursday, April 12, 2012
Materials
While a top bar hive could be made out of pretty much anything, I want to be sure mine will last for a while and gives the bees an optimal working environment. I flattened out my hive plans,
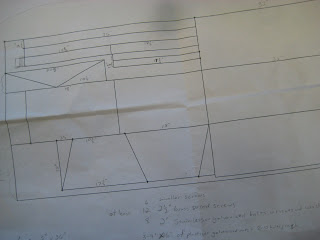
searched for appropriately sized lumber, and put together a materials list.
(3) 1"X12"X6' #2 Pine boards
Galvanized (or brass) wood screws - I chose 2 1/2"
(8) 2" galvanized hex bolts, nuts, and washers
Total price = $50.22
I thought this would be enough wood for both the hive body and the lid, but that turned out not to work. More on that later.
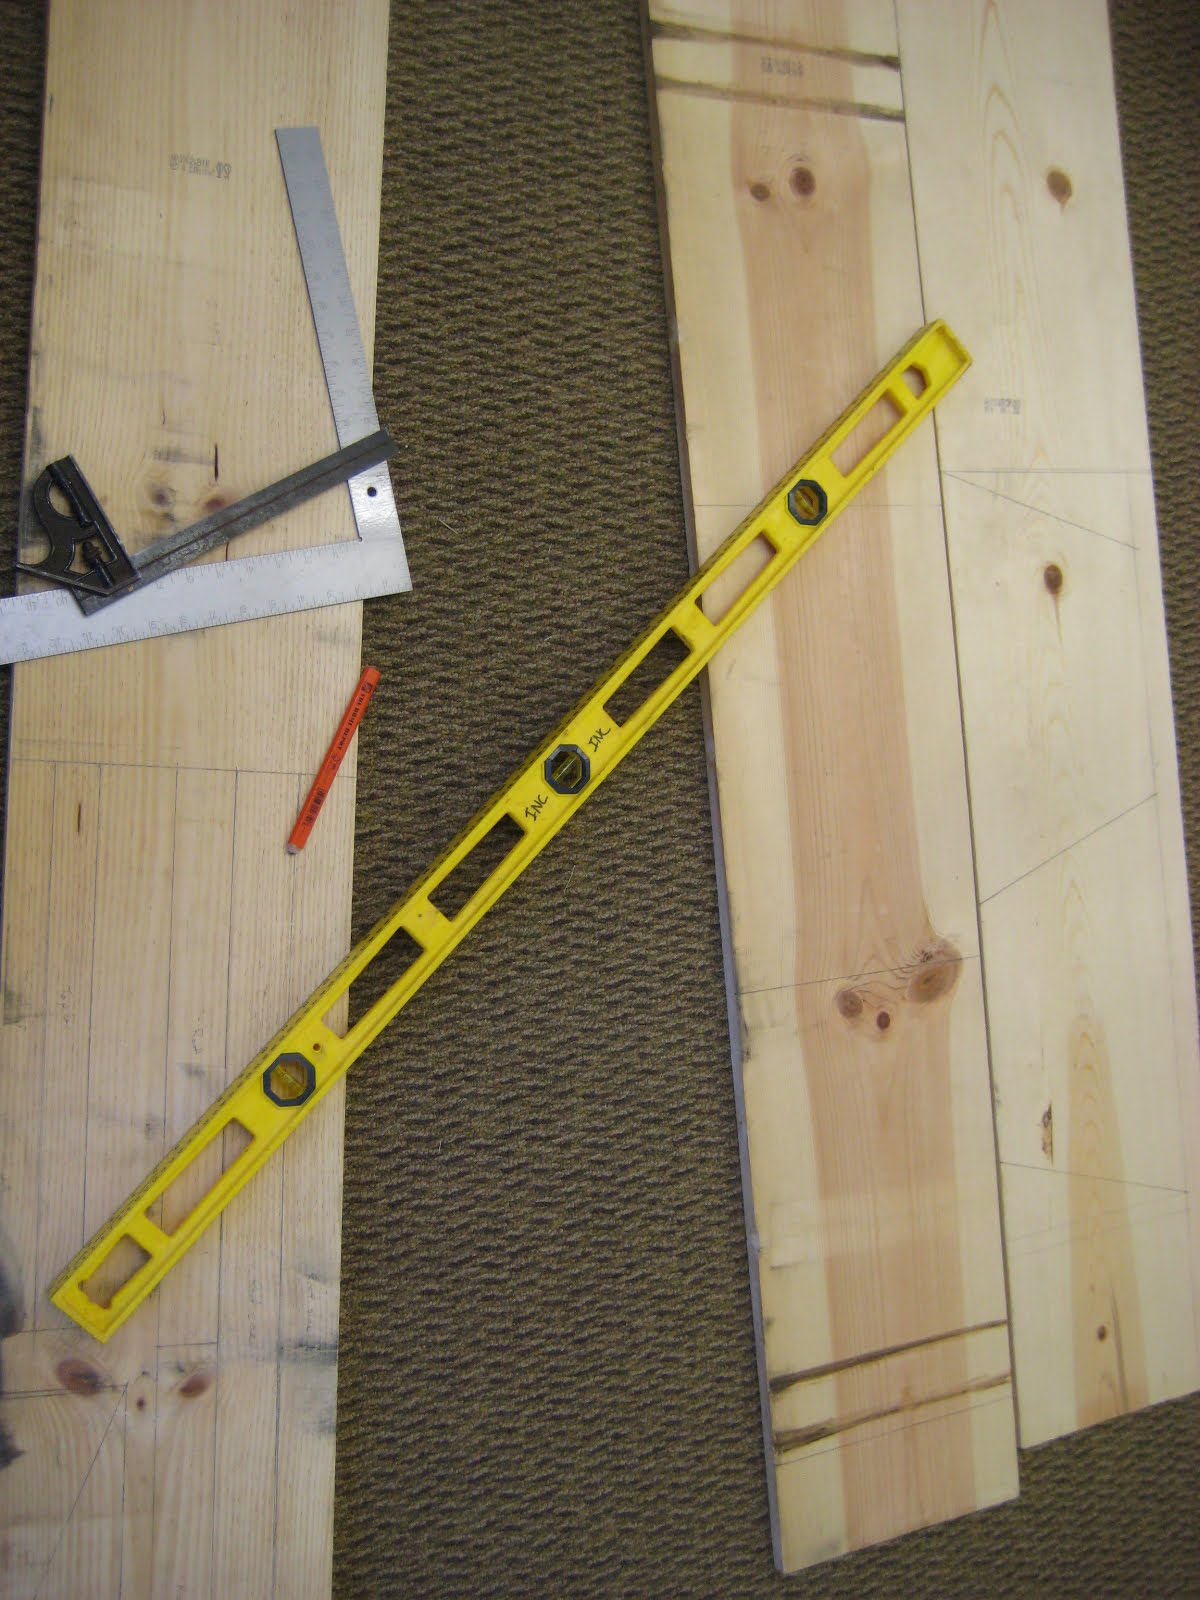
After marking up the wood, I was ready to begin cutting.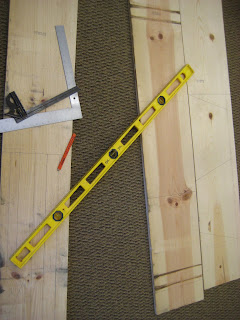
I've never really done much woodworking and quickly found that some of my cuts and measurements were not quite right. Fortunately, the critical angles, widths, and lengths were on par.
There are very few important measurements when building a top bar hive. Since, in my case, I wanted to be based on the golden mean, I wanted to be sure that the sides of the hive would meet the bottom at a 120 degree angle. This meant the follower boards had to be the correct dimensions. Follower boards are meant to fit exactly into the hive, hugged by both sides and the bottom and suspended by a top bar. Honeybees tend to fill in any cracks they don't want in the hive, and if the follower boards are not snug, the bees may build propolis around the air spaces which would result in quite a bit of scraping just to get the boards out.
The purpose of the follower board is to limit the size of the hive and keep the bees in the part of the hive you want them. As the colony grows, moving the boards outward allows you to make a bigger space for your bees. Too much space too soon could prove stressful and limit the bees ability to climate control the hive.
Fortunately, I was patient when cutting and piecing together the follower boards and they came together just right. Once they were together, I could set the sides along the angles and trace the front and back boards of the hive to know where I would need to drill holes and insert screws. Again, these are important measurements so the internal dimensions of the hive will be the same front to back. Now I was ready to build!
The front and back screwed into the sides:
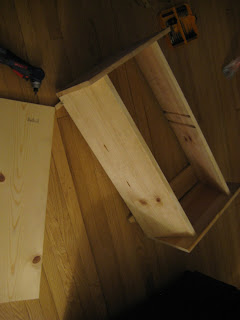 The bottom board also screwed into the front and back boards (at this point I realize I'm making a manger):

You can see the follower boards inside the hive in this picture. Eventually, the bottom board will have a rectangle cut into the bottom with hardware cloth covering the opening. This will allow for ventilation in the hive. Since it needs to be cut out with a jigsaw, I was able to attach the bottom before worrying about the hole.
Unfortunately, I did screw up my measurements and cuts for the roof/lid. I'm glad I did though because I think my original lid would have been too fancy and heavy and I decided to pare it down. I'll have more on that once it is finished.

searched for appropriately sized lumber, and put together a materials list.
(3) 1"X12"X6' #2 Pine boards
Galvanized (or brass) wood screws - I chose 2 1/2"
(8) 2" galvanized hex bolts, nuts, and washers
Total price = $50.22
I thought this would be enough wood for both the hive body and the lid, but that turned out not to work. More on that later.
After marking up the wood, I was ready to begin cutting.
I've never really done much woodworking and quickly found that some of my cuts and measurements were not quite right. Fortunately, the critical angles, widths, and lengths were on par.
There are very few important measurements when building a top bar hive. Since, in my case, I wanted to be based on the golden mean, I wanted to be sure that the sides of the hive would meet the bottom at a 120 degree angle. This meant the follower boards had to be the correct dimensions. Follower boards are meant to fit exactly into the hive, hugged by both sides and the bottom and suspended by a top bar. Honeybees tend to fill in any cracks they don't want in the hive, and if the follower boards are not snug, the bees may build propolis around the air spaces which would result in quite a bit of scraping just to get the boards out.
The purpose of the follower board is to limit the size of the hive and keep the bees in the part of the hive you want them. As the colony grows, moving the boards outward allows you to make a bigger space for your bees. Too much space too soon could prove stressful and limit the bees ability to climate control the hive.
Fortunately, I was patient when cutting and piecing together the follower boards and they came together just right. Once they were together, I could set the sides along the angles and trace the front and back boards of the hive to know where I would need to drill holes and insert screws. Again, these are important measurements so the internal dimensions of the hive will be the same front to back. Now I was ready to build!
The front and back screwed into the sides:
 The bottom board also screwed into the front and back boards (at this point I realize I'm making a manger):
You can see the follower boards inside the hive in this picture. Eventually, the bottom board will have a rectangle cut into the bottom with hardware cloth covering the opening. This will allow for ventilation in the hive. Since it needs to be cut out with a jigsaw, I was able to attach the bottom before worrying about the hole.
Unfortunately, I did screw up my measurements and cuts for the roof/lid. I'm glad I did though because I think my original lid would have been too fancy and heavy and I decided to pare it down. I'll have more on that once it is finished.
Monday, April 9, 2012
Why Bother?
There are three primary reasons I want to have a beehive:
1) I am a naturalist by trade, am terribly fascinated with honeybee societies, and would like to get up-close and personal with one.
2) There is something satisfying about cultivating natural resources. Beekeeping seems to combine a number of hobbies (woodwork, agriculture, culinary art, etc.) into one.
3) Fresh home-grown honey on my homemade fried tortillas!

Tuesday, April 3, 2012
So I decided to get bees . . . now what?
In Maryland, anyone who wants to keep bees is required to have a hive with movable frames. A frame is the foundation on which the honeybees will build their wax comb. Traditionally, these have been wooden frames nailed together with a piece of wax (or more modernly, plastic) foundation put in the middle.
The frames are placed in a box (what is known as the Langstroth hive) with enough space between them for a bee to maneuver, make honey, drop off pollen, and raise brood. "Bee space" is approximately 3/8". It was discovered by the namesake of the Langstroth hive, Reverend Lorenzo Langstroth, that bees would not build comb if they did not have at least this much space.
Top bar hives are more primitive than this, for better or worse. While the Langstroth frames work great for honey production, it is theorized that the foundation used does not allow the bees to make the hexagons in the honeycomb the appropriate size for preventing disease and controlling mites. Natural combs are built different sizes for different tasks and the bees are able to chose to build what they need when they need it. In a top bar hive, the bees are allowed to do this. The top bars are simply a bar resting across the top of the hive that the bees are able to build their comb on. The comb is suspended perpendicularly to the ground in a "U" shape. While this tends to mean less honey production, it also allows the bees to manage themselves a bit more by building how they prefer to build.
Upon discovering that people use top bar hives as an inexpensive, less intense way to keep bees, I decided to start a hive of my own. I had worked with the Langstroth Hive in college and know a good bit about the life-cycle and needs of a bee colony. Unfortunately, I don't know a lot about building things, nor do I have the tools necessary. So I began surfing the web for suggestions.
There are plenty of folks out there who make top bar hives for sale. There are not enough folks, however, competitively drive down prices. While the hives offered are pretty, I'm not about to drop $300-400 on a beehive that people in Kenya are making out of re-purposed materials. In fact, this is one of the great advantages of the top bar. You can make it out of virtually anything so long as it is sturdy, holds the bars flat, and is made out of materials that won't poison the bees or honey (e.g. pressure treated lumber).
Fortunately, I stumbled upon a "beginning beekeeping" website that mentioned a bloke name Philip Chandler, the Barefoot Beekeeper. Mr. Chandler has written a book on the subject of natural beekeeping as well as plans for a top bar hive. I had a starting point!
I browsed many other websites, but Chandler's plans were the best laid out for free. I liked the idea of a golden mean hive as the golden mean does seem to pop up a lot in nature, so I slightly altered the dimensions. Basically, I made my hive the lower portion of a pentagon.
Next up: Finding the right materials and tools.
The frames are placed in a box (what is known as the Langstroth hive) with enough space between them for a bee to maneuver, make honey, drop off pollen, and raise brood. "Bee space" is approximately 3/8". It was discovered by the namesake of the Langstroth hive, Reverend Lorenzo Langstroth, that bees would not build comb if they did not have at least this much space.
Top bar hives are more primitive than this, for better or worse. While the Langstroth frames work great for honey production, it is theorized that the foundation used does not allow the bees to make the hexagons in the honeycomb the appropriate size for preventing disease and controlling mites. Natural combs are built different sizes for different tasks and the bees are able to chose to build what they need when they need it. In a top bar hive, the bees are allowed to do this. The top bars are simply a bar resting across the top of the hive that the bees are able to build their comb on. The comb is suspended perpendicularly to the ground in a "U" shape. While this tends to mean less honey production, it also allows the bees to manage themselves a bit more by building how they prefer to build.
Upon discovering that people use top bar hives as an inexpensive, less intense way to keep bees, I decided to start a hive of my own. I had worked with the Langstroth Hive in college and know a good bit about the life-cycle and needs of a bee colony. Unfortunately, I don't know a lot about building things, nor do I have the tools necessary. So I began surfing the web for suggestions.
There are plenty of folks out there who make top bar hives for sale. There are not enough folks, however, competitively drive down prices. While the hives offered are pretty, I'm not about to drop $300-400 on a beehive that people in Kenya are making out of re-purposed materials. In fact, this is one of the great advantages of the top bar. You can make it out of virtually anything so long as it is sturdy, holds the bars flat, and is made out of materials that won't poison the bees or honey (e.g. pressure treated lumber).
Fortunately, I stumbled upon a "beginning beekeeping" website that mentioned a bloke name Philip Chandler, the Barefoot Beekeeper. Mr. Chandler has written a book on the subject of natural beekeeping as well as plans for a top bar hive. I had a starting point!
I browsed many other websites, but Chandler's plans were the best laid out for free. I liked the idea of a golden mean hive as the golden mean does seem to pop up a lot in nature, so I slightly altered the dimensions. Basically, I made my hive the lower portion of a pentagon.

Next up: Finding the right materials and tools.
Monday, April 2, 2012
The Bee-ginning
Back in 2007, I took an apiology class with Dr. Dewey Caron at the University of Delaware. I thoroughly enjoyed the course, managed an A, and could not wait to get a hive of my own. Unfortunately, I had 2 years left to my degree, little money to start an apiary, and nowhere to put the bees.
Now, I am a naturalist at a local non-profit nature center. I plan on staying in the area for a while as my wife, Catie, and I like life here so far. It seems I have the time for beekeeping all of a sudden after years of moving from one seasonal job to the next.
The nature center already has several hives of bees and even produces a modest amount of honey for sale. It sits on 116-acres of former pasture land and secondary growth forest. It would be easy to keep a hive here without disturbing the public or the bees. I have the space.
Then I discovered a low maintenance, inexpensive hive called the top bar. These hives are used in many countries around the world but have been forgotten in the U.S. for centuries due to the success of the Langstroth hive. They have been resurrected by amateur beekeepers for the ability to make and manage them cheaply, the idea that they are a more "natural" way to keep bees, and that they are rather attractive in a back yard (when made well). I have the money!
And so begins my adventure in beekeeping and managing a top bar hive colony.
Subscribe to:
Posts (Atom)